The Guide to Total Connect 2.0 Notifications
Posted By Michael GorisIf you have a Honeywell System with access to Total Connect 2.0, then you will probably want to set up some TC2 notifications. These are used for sending you text and email alerts regarding activity on your alarm system. You will have no trouble setting them up once you know how they work.

Before fully diving into the process of setting up notifications, it's important to understand exactly how TC2 notifications are organized. Notifications are sent out when predetermined system activity events occur, such as arming, disarming, AC power loss, a system alarm, or even just a faulted zone. The recipients of any given notification are determined based on the assigned notification group. Each notification group will have at least one assigned user, and each user can have multiple email addresses and phone numbers set up on their profile.
To break it down, a user must be assigned to a notification group, and that notification group must be associated with the particular event or events that they want to be notified about. Once the event occurs, every user within the assigned notification group will receive the alert. Each user can assign email addresses for email alerts and/or phone numbers for text alerts. Every assigned email and phone number will ultimately be used for notifications, provided that everything has been set up correctly.
Where some people can have trouble with TC2 notifications is when trying to set them up for multiple users. This is usually the case for families, where multiple people in the household want to each receive their own set of notifications. The solution is often to set up a unique user profile for every person who will be using the system and receiving notifications. Each user will need to choose a user code for controlling the system locally. If you want to limit the number of codes on your system, then the other option is to assign multiple email addresses and/or phone numbers to a single user profile. But the downside to doing that is that you won't have any real way of setting who receives what. The point here is that there are multiple ways to ensure that everyone using the system can receive notifications.
Total Connect 2.0 notification can be set up and configured from both the Total Connect 2.0 website and the Total Connect 2.0 mobile app. For our examples, we will mostly be focusing on the website, but understand that these menus are mostly the same on the app. They just might be organized slightly differently to better fit the smaller dimensions of a mobile phone. Really, both the website and mobile app are laid out very similarly, so if you can use one, then you should have very little trouble switching over to the other if needed. The important thing is to understand what all of the various terms mean and how they are all related.
First, let's take a look at the Users Menu of Total Connect 2.0. Like we said earlier, the most common practice is to set up an individual user account for each person who will be regularly using the system and receiving notifications. But if you are trying to limit the number of codes on your panel, then assigning multiple email addresses and/or phone numbers to a single user profile is also an option. On the TC2 website, you can easily locate the Users drop-down menu on the left-hand side.
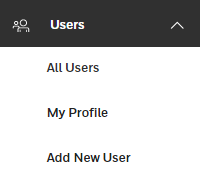
As you can see, the available options within Users are All Users, My Profile, and Add New User. The All Users option is useful if you are logged into a Total Connect 2.0 account with admin access. It will show all the users you have set up. My Profile is used for adjusting the settings for the user who is currently logged into TC2. This includes setting the user's name, preferred language, TC2 login password, assigned email addresses, assigned phone numbers, and even the security code they use with the panel. And the Add New User option is used for adding a new user to the Panel and if desired, to the Total Connect 2.0 account.
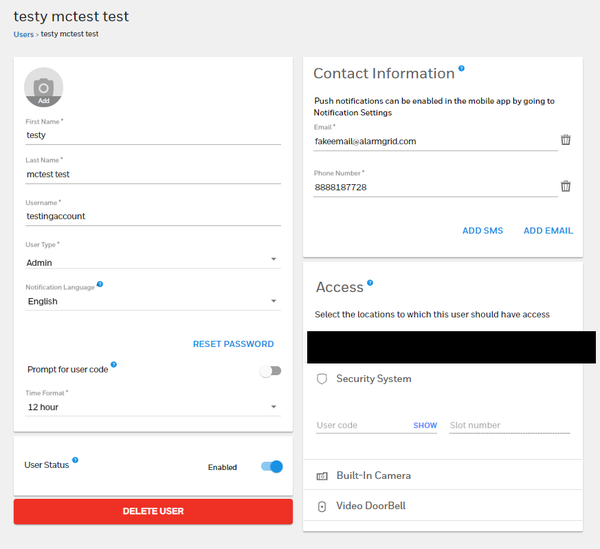
In the picture above, note the "Add SMS" and "Add Email" buttons. These are used for adding additional phone numbers and email addresses to a profile. Each assigned email and phone number will be used for notifications. If you don't want to create multiple users, then that is a method for ensuring that multiple people receive notifications. Just keep in mind that you will have no way of distinguishing which emails and phone numbers will receive which notifications. All emails and phone numbers assigned to the profile will be getting all the alerts.
Alternatively, if you create multiple user profiles, then you can pick and choose which profiles will be assigned to which notification groups. This is how you can set certain users to receive notifications regarding specific system events, while other users won't necessarily have to receive the same alerts for the same events. Whichever option you choose will work fine, and it's totally up to you. But you will have greater flexibility by creating multiple users.
Next, we would like to turn our attention to the Notifications Menu. This is where you will set up notification groups. Recall that different users can be assigned to different notification groups. Each notification group can correspondingly be assigned to different system events that will trigger notifications being sent out.
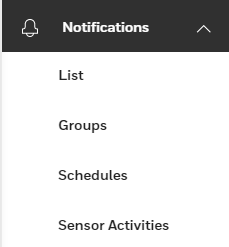
From the top, List shows the list of the specific system event triggers that will cause notifications to be sent out. Groups are the famous notification groups that we have been talking about throughout this post. Schedules are used for establishing set schedules for predetermined security and automation events to occur. Sensor Activities allows you to select specific sensors so that you can see if the sensor is faulted right from the main page of TC2, rather than having to access the complete system sensors list. For our purposes here, only List and Groups are really important.
After you have created the necessary user profiles and assigned email addresses and phone numbers to said profiles as needed, the next logical step is to create notification groups using the Groups option under the Notifications drop-down menu. If you click on the button with the two people and the + sign, then you can create a new notification group. This will involve providing a name for the notification group and choosing which users are included.

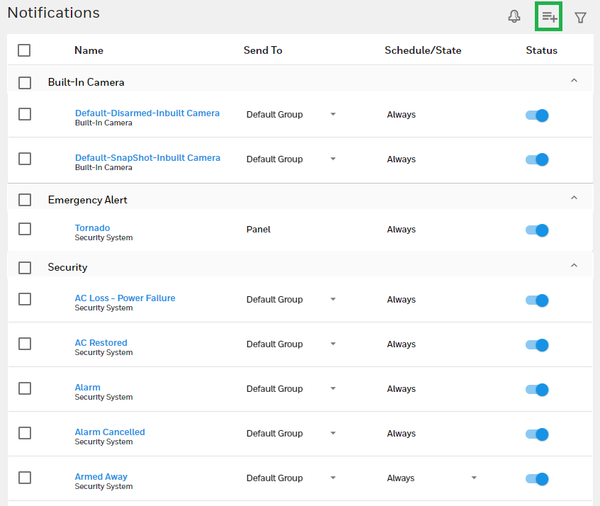
Upon building notification groups, you now get to the juicy step of actually building the triggers that will cause notifications to be sent out. These notification triggers are the actual system events that you want to be alerted about. To access this section, select List under the Notifications drop-down menu. You will likely find a bunch of notifications pre-assigned to the Default Group if you have never configured these settings before. To build new notifications, click the icon with three horizontal bars and the + sign. This will involve choosing the specific event that will trigger the notification to be sent out, as well as selecting the notification group that will receive the notification.
We know we've covered a lot of information here, so let us give a quick recap of the steps involved:
- Make user profiles. Each user profile will be able to control the system locally using their own user code. And Standard and Admin profiles will be able to access Total Connect 2.0 to control the system remotely. In most cases, each user profile will represent a different individual who uses the security system.
- Assign phone numbers and/or email addresses to user profiles. These are the contact points for sending notifications. Every added phone number and email will be contacted when a notification is triggered to be sent to the associated user. Note that phone number contacts are for text message alerts, NOT phone calls.
- Build notification groups. Each notification group consists of one or more user profiles. Every user in the notification group will receive notifications based on their assigned phone number(s) and/or email address(es) when a notification is triggered to be sent out. If you only want some users to receive a certain type of notification, then build a notification group that includes the relevant users, while leaving out users who do not need to be notified or who may receive the intended notification based on their inclusion in a different group.
- Create notifications. These are the actual system triggers that will cause a notification to be sent out. When creating a notification, you must select what system event will trigger the notification, and you must also choose which notification group will receive the alert.
Lastly, we briefly want to touch on push notifications that you can set up on your Android or iOS device. A push notification is sort of like a text message notification, in the aspect that it will appear on your phone. But the big difference is that the alert will not appear through your text messaging app, but rather from the TC2 app itself. These push notifications can only be configured by using the Total Connect 2.0 mobile app on a mobile device or tablet. You cannot set up push notifications using a web browser. After enabling Push Notifications from within the TC2 app on your device, you will be prompted by your phone or tablet to allow the App to perform Push Notifications.
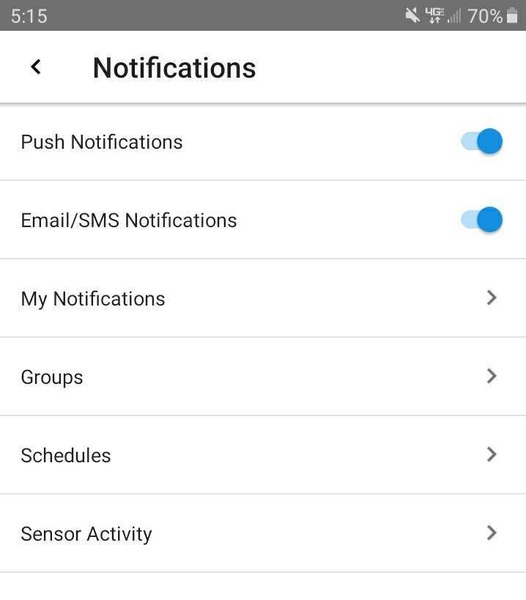
First, we will discuss enabling Push Notifications from within an Android device. Upon opening up the TC2 app and logging into your TC2 account, click the three horizontal bars in the upper-left corner. Then choose Settings, followed by Notifications. You can then toggle the Push Notifications option ON or OFF. To set which system events will trigger push notifications, use the My Notifications option.
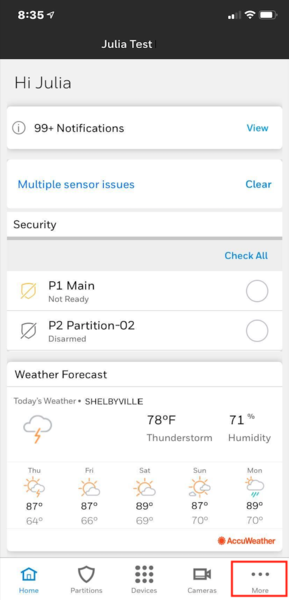
When using an iOS device, you will reach the option for Push Notifications by clicking the "More" option in the lower right corner of the main screen. From there, go to Settings > Notifications > Push Notifications, making sure that the option is enabled. Once you enable this option through the app, you will be prompted by the phone or tablet to allow the TC2 App to send you Push Notifications.
We really hope that this helps some users overcome their struggles with receiving TC2 notifications. If you are monitored by Alarm Grid, and you are still struggling with Total Connect 2.0 notifications, please feel free to email us at support@alarmgrid.com for extra assistance. We are certainly happy to help you out so that you can get notifications set up exactly how you want them. Our hours for checking emails run from 9am to 8pm ET M-F, so keep that in mind. We look forward to hearing from you!
Vivint monthly cost trends
This blog providesdetails of Vivint alarm system.
from
https://www.alarmgrid.com/blog/the-guide-to-total-connect-2-0-notifications
Syndicated from The Guide to Total Connect 2.0 Notifications - Alarm Grid
No comments:
Post a Comment